在上篇文章中,我们基于expo搭建了App的基础框架。在现代移动应用中,消息推送功能是提升用户体验的重要组成部分。本文将指导你如何在Expo环境中实现消息推送的功能,包含iOS与Android,以帮助你的用户及时接收到重要信息。
什么是Expo?
Expo是一个开源平台,可帮助开发者轻松构建和部署React Native应用。它提供了许多工具和服务,简化了应用开发流程,尤其是在处理消息推送方面。
准备工作
在开始之前,确保你已经完成如下准备工作:
-
安装Node.js:Expo需要Node.js环境来工作。
-
安装Expo CLI:在终端中运行以下命令安装Expo CLI:
1npm install -g expo-cli -
安装Java SDK11版本:因为后续实现Android的消息推送需要Java SDK的11版本,所以这里必须安装Java 11。
-
创建新项目:
1expo init MyAwesomeApp 2cd MyAwesomeApp
设置消息推送- iOS
iOS的消息推送比较简单,可以直接使用Expo自带的消息推送库。
1. 安装所需依赖
使用以下命令安装expo-notifications库,它支持推送通知的功能:
1expo install expo-notifications
2. 配置应用
接下来,打开你的app.json文件,添加推送通知的配置:
1{
2 "expo": {
3 "notification": {
4 "icon": "./assets/icon.png",
5 "color": "#000000"
6 }
7 }
8}
3. 请求权限
在你的组件中,请求用户的通知权限:
1import React, { useEffect } from 'react';
2import { Button, Platform } from 'react-native';
3import * as Notifications from 'expo-notifications';
4import * as Permissions from 'expo-permissions';
5
6const App = () => {
7 useEffect(() => {
8 registerForPushNotificationsAsync();
9 }, []);
10
11 const registerForPushNotificationsAsync = async () => {
12 const { status: existingStatus } = await Permissions.getAsync(Permissions.NOTIFICATIONS);
13 let finalStatus = existingStatus;
14
15 if (existingStatus !== 'granted') {
16 const { status } = await Permissions.askAsync(Permissions.NOTIFICATIONS);
17 finalStatus = status;
18 }
19
20 if (finalStatus !== 'granted') {
21 alert('通知权限未获得!');
22 return;
23 }
24
25 const token = (await Notifications.getExpoPushTokenAsync()).data;
26 console.log(token);
27 };
28
29 return (
30 <Button title="发送推送" onPress={sendPushNotification} />
31 );
32};
33
34const sendPushNotification = async () => {
35 const message = {
36 to: '<YOUR_EXPO_PUSH_TOKEN>',
37 sound: 'default',
38 title: '通知标题',
39 body: '这是消息的内容。',
40 data: { someData: 'goes here' },
41 };
42
43 await Notifications.scheduleNotificationAsync({
44 content: message,
45 trigger: null,
46 });
47};
48
49export default App;
4. 发送推送通知
在上面的代码中,sendPushNotification函数使用Expo的推送通知服务发送消息。替换<YOUR_EXPO_PUSH_TOKEN>为接收通知的用户的设备Token。
5. 在服务器上处理推送请求
为了更好地管理推送通知,你可能想在服务器上处理发送请求。可以使用Node.js和axios库来实现:
1const express = require('express');
2const bodyParser = require('body-parser');
3const axios = require('axios');
4
5const app = express();
6app.use(bodyParser.json());
7
8app.post('/send-notification', async (req, res) => {
9 const { token, message } = req.body;
10
11 try {
12 await axios.post('https://exp.host/--/api/v2/push/send', {
13 to: token,
14 sound: 'default',
15 title: message.title,
16 body: message.body,
17 });
18 res.status(200).send('通知已发送');
19 } catch (error) {
20 console.error(error);
21 res.status(500).send('发送通知失败');
22 }
23});
24
25app.listen(3000, () => {
26 console.log('服务器正在运行在 http://localhost:3000');
27});
设置消息推送- Android
Expo的Android端的消息推送需要使用Google的一些服务,因为国内的网络原因,无法使用。这里我们使用国内的一款优秀的消息推送工具个推来实现Android端消息推送。
-
安装个推:在终端中运行以下命令安装个推:
1npm install react-native-getui -
注册账号:去个推官网注册账号www.getui.com 并创建应用,获取到应用的AppID、AppKey及 AppSecret。
-
使用方法:
1import Getui from 'react-native-getui';
2function App(props) {
3 useEffect(() => {
4 if (Platform.OS !== 'ios') {
5
6 const receiveRemoteNotificationSub = NativeAppEventEmitter.addListener(
7 'receiveRemoteNotification',
8 (notification) => {
9 handleNotification(notification);
10 }
11 );
12
13 const clickRemoteNotificationSub = NativeAppEventEmitter.addListener(
14 'clickRemoteNotification',
15 (notification) => {
16 handleNotification(notification);
17 }
18 );
19 Getui.clientId((param) => {
20 addUserExpoToken(param)
21 setClientId(param);
22 console.log("clientId---", param)
23 });
24 Getui.version((param) => {
25 setVersion(param);
26 console.log('version---:', param)
27 });
28
29 Getui.status((param) => {
30 let status = '';
31 switch (param) {
32 case '0':
33 status = '正在启动';
34 break;
35 case '1':
36 status = '启动';
37 break;
38 case '2':
39 status = '停止';
40 break;
41 }
42 setStatus(status);
43 });
44 }
45 }, []);
46
47}
因为react-native-getui不支持Expo,所以这里我们要采用裸工作流的方式打包Android端App,以下是打包步骤及中间需要修改的地方:
- 在终端中运行以下命令:
1npx expo prebuild
运行完成后,文件夹根目录下会生成两个文件夹分别是android及ios,这里我们只关注android这个文件夹。
- 打开
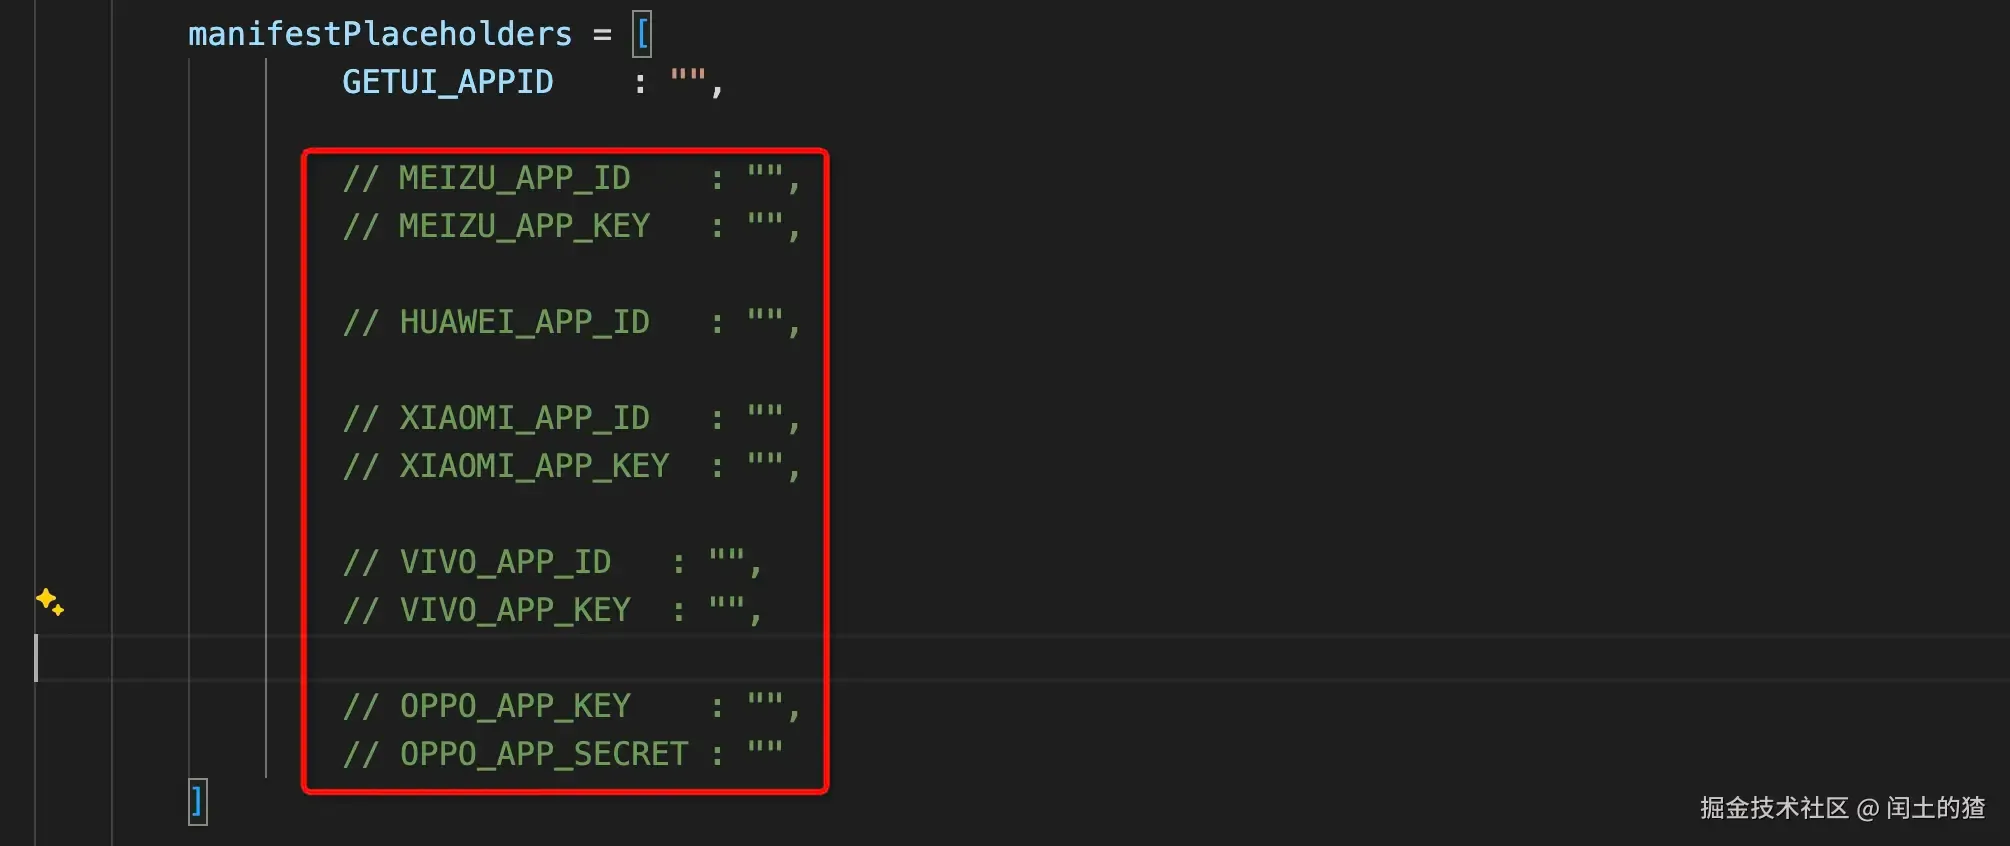
android/app/build.gradle文件在defaultConfig下添加以下代码。拿到上述的AppID、AppKey及 AppSecret。
1
2 manifestPlaceholders = [
3 GETUI_APPID : "AppID",
4 GETUI_APP_ID : "AppID",
5 GETUI_APP_KEY : "AppKey",
6 GETUI_APP_SECRET : "AppSecret"
7 ]
- 注释
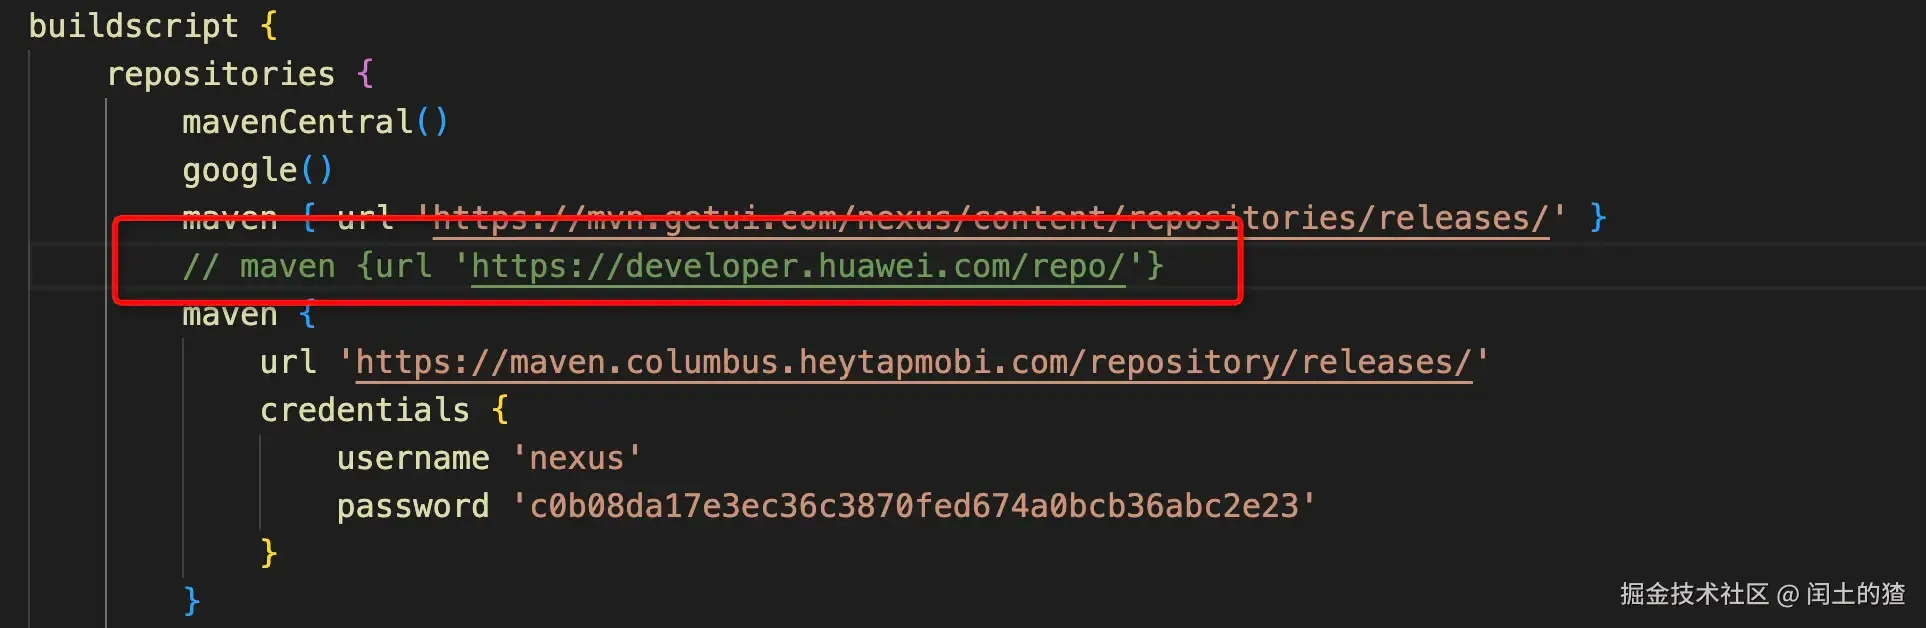
react-native-getui中影响打包的代码,每次安装新的插件后都要在node_modules文件夹中找到react-native-getui/android/build.gradle文件注释以下代码

Android端打包命令
1cd android
1./gradlew assembleRelease
运行完以上命令,执行完成后在/android/app/build/outputs/apk/release中会生成app-release.apk。
请注意:这种方式无法在开发环境测试消息推送,可使用模拟器安装打包后的apk文件进行调试。
小结
通过以上步骤,你已经成功设置了在Expo应用中使用消息推送的基本功能。可以根据自身业务需求调整推送通知的内容和触发条件。例如,根据特定事件(如用户登录、订单状态更新等)发送通知,增强用户体验!
希望这篇文章能帮助你更好地使用Expo进行App开发。若有任何疑问,可以在评论区交流。